Recently, several users reported receiving an error code 0x81000019 when they attempt to create a backup on their devices. This is actually associated with VSS and SPP event logs and may accompany an error message that reads – “A shadow copy could not be created“. Well, in this post, we have discussed the reasons causing this bug along with a few working solutions.
The backup error code 0x81000019 arises mainly when there are storage-related issues on the computer. Besides this, certain services not functioning properly and corrupted system files may also result in similar issues. Freeing up occupied spaces, restarting essential services, and correcting system files are some of the solutions that we look upon to fix this issue. Let’s explore these solutions in detail –
Backup Error Code 0x81000019 Solutions
Before following the below workarounds, make sure to disable Windows Firewall as well as Microsoft Defender –
1. Extend System Reserved volume
First of all, check the current status of the reserved partition on your computer. To do so, follow the below guideline –
- Hit the Start button and type “disk partitions” in the text field.
- Click the top result i.e. “Create and format hard disk partitions“.
- When the “disk management” window opens up, check the system reserved partition size. This must show at least 100 MB.
If the reserved storage size is less than 100 MB or the free space less than 40 MB, you must free-up some of the storage spaces by deleting unnecessary files.
The best way to free up additional spaces on Windows 10 is by running the Disk Cleanup tool. Here’s how to run this utility program –
- Press Win + R to launch the Run command.
- Type “
cleanmgr” at the void and hit OK. - Select the “(C:) drive” using the drop-down menu.
- Hit OK to initiate a scan finding files that might be occupying unnecessary spaces.
- When the scanning completes, click “Clean up system files“.
- Re-select the C: drive and click OK.
- Succeeding after, mark all the checkboxes and hit OK.

- There should appear a final confirmation message by Disk Cleanup, click Delete files.
- Let the system get rid of non-essential items and once over, Restart your computer.
2. Remove Unnecessary Language packs
In case you have previously downloaded additional language packs, try uninstalling them so that more storage spaces become available on the computer. For this, you may follow the below instructions –
- Navigate to
Settings > Time & Language > Language. - Jump to the right pane and scroll down to find if there lie any additional packs.
- If you do find more languages other than the default one, click over the specific language (not in use), and hit Remove.
- Do this for all the language packs that you rarely use. After removing all the languages, reboot your PC.
Sign back into your computer and try to create a backup again. This time it should work without getting into any trouble.
3. Delete redundant Restore points
Since the error 0x81000019 occurs due to storage-related problems, make sure to clear any redundant backups on the computer. For freeing up extra spaces occupied by these backups, use the below guideline –
- Press Win + Pause/Break keys altogether.
- On the settings window, click the System protection link.
- Next, click configure as shown below on the System Properties window.
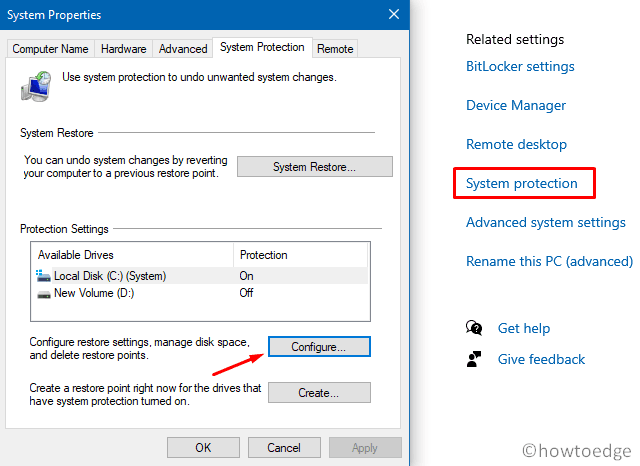
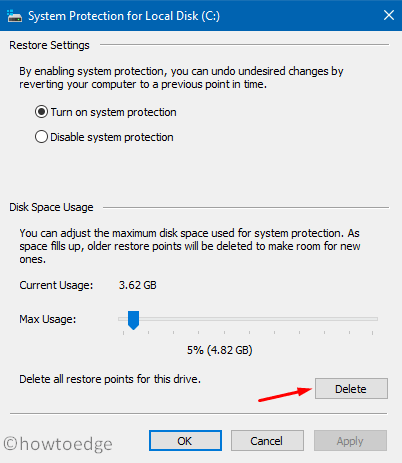
- Subsequently, click Delete. Select and remove not required restore points.
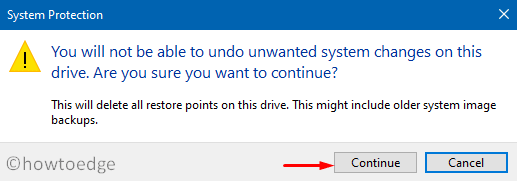
- If there pops up a confirmation message, hit continue.
- Lastly, Restart Windows.
4. Restart Backup-related Services
Many a time, such backup error arises just because the essential services were not running in the background. The volume shadow copy is one such service that must be running to create a system backup. Here’s how to restart this service with all its parameters at their places –
- Click over the Windows icon and start typing “services”.
- Double-click the well-matching result to enter the Services window.
- Scroll down and locate Volume Shadow copy.
- When found, right-click over this and select the Properties option.
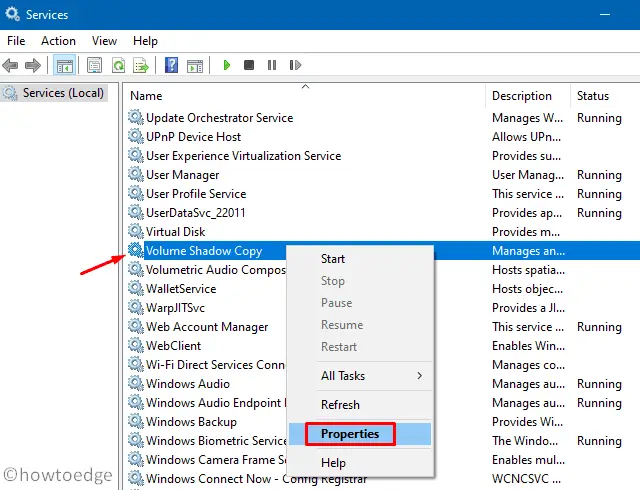
- On the upcoming pop-up, select Automatic using the drop-down menu next to
Startup type. - If the service status reads stopped, hit Start.
| Tip: In case this service was already running, stop this first. Henceforth, wait for a few seconds and restart this back. |
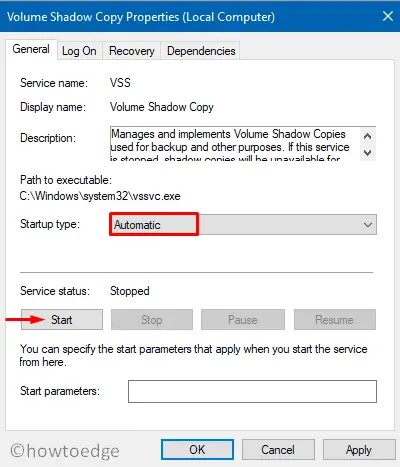
- Hit Apply then OK to confirm these changes.
Note: You must restart other backup-related services as well to get rid of the 0x81000019 issue. The services that require an utmost restart are as follows –
- Windows Backup services
- Block Level Backup Engine Service
- Remote Procedure Call
- RPC Endpoint Mapper
- Software Protection Properties
At last, close the services window and Restart Windows. From the next logon, you shouldn’t face difficulty while creating system backups.
5. Run SFC and DISM scans
The backup failed error usually occurs due to storage-related issues on the computer and should get resolved by following the above suggestions. However, there is a possibility that system files get corrupted somehow and thus cause the error 0x81000019 while creating backups. In order to fix issues like broken kernel files, corrupted system files, you should take the help of basic scanning/repairing programs like SFC or DISM. Here’s how to run SFC then DISM on the same platform.
- Launch Command Prompt having Admin rights.
- Type SFC /Scannow on the black screen and press Enter.

- When the repairing of missing/damaged system files completes, reboot your computer.
- Sign back into your computer and execute the below code this time to repair broken Windows Image –
DISM /online /Cleanup-Image /RestoreHealth

- Press Enter to start repairing the Windows Image file.
Reboot your device and check if this solves the Backup Error Code 0x81000019 on your computer. In case you have any queries or suggestions, let us know in the comment section.


