We often face problems while doing basic tasks or operations on the Windows operating system. With Windows 11 still new, chances are pretty high that you get into some issues like the system running slow, crashes every now and then, or others. The first thing that comes to our mind is to perform a clean install of Windows OS again, however, we all know that isn’t an easy task. This is why we have brought this article that explains crucial ways to repair Windows 11.
In this guide, we have included almost all issues that you may encounter while running the new OS, and how to fix them separately. So, if you do feel your Windows 11 PC running slow, or crashing suddenly, read this tutorial till the last.

Is there a repair tool for Windows 11?
Though there isn’t a single official tool by Windows that can automatically repair Windows 11 of various issues and bugs, you may try out MalwareBytes. This is a third-party premium tool that can check for the problems inside your PC and repair them, if possible.
If you don’t want to go for a premium tool, consider applying the below fixes one after another.
How to Download Windows 11 ISO File and Install it on your PC
How to Repair Windows 11 OS
If you are facing trouble operating Windows 11 Operating system, you may troubleshoot it by applying the below workarounds –
- Troubleshoot Windows 11
- Run SFC – System File Checker
- Run DISM
- Uninstall then Reinstall Windows 11 updates
- Use previously created restore point
- Check if there is storage related issue
- Fix Windows 11 Boot Issues
- Perform Windows 11 Startup repair
- Reset your PC
1] Troubleshoot Windows 11
Windows 11 includes a great tool for each one of its functions like – Update, Windows Store, Audio, Graphics, and many others. Whenever you face problems using any key component on Windows 11, go to its troubleshooting setting, and run it. This tool will automatically search for possible issues and fix them on your behalf. Even, in cases, where it can’t identify the sole cause, this will tell you a set of instructions that may help.
That’s the reason why we suggest troubleshooting more often in our solutions. Let’s have a look at how to perform this task on Windows 11 –
- Click on the Start menu, type settings, and click on the top result.
- On the Settings window, select System and then Troubleshoot on the right pane.

- Click Other troubleshooters next.

- The system will display a list of items that you may troubleshoot. Choose the program with which you are facing difficulty, and hit the Run button.

- Follow the on-screen instructions and see if it helps to resolve the issue.
Running this tool alone fixes several bugs and issues that you are struggling with on your computer.
2] Run SFC/DISM
System File Checker (SFC) is a command-line program that is used to scan and verify Windows files. Upon running, this checks whether the protected files are corrupted, damaged, fit for running, or not. If while running, this finds any problematic or missing files, SFC will try its best to replace faulty ones with fresh files. Here’s how to run this program –
- Press Win + X, and choose the option – Windows Terminal (Admin).
- On the elevated console, type “
sfc /scannow“, and press Enter.

Note: SFC /SCANNOW is not specific to any specific Windows environment. So, you can run it on either Windows PowerShell, or Command Prompt. The only necessity is that you opened it as an administrator.
- Wait till the scanning/repairing process reaches 100%.
If this tool finds any damaged files/folders on your computer, this will repair them automatically. When it finishes repairing your device, make sure to restart your PC. This is to ensure the changes made become effective from the next login.
How to Enable or Disable Startup Programs in Windows 11
3] Run DISM Scan
Deployment Image Servicing and Management (DISM) is another important tool in the world of Windows. Using this tool, one can easily find and replace any inconsistency in the image files. This normally works with multiple types of Windows 11 images (.wim or .esd image formats before conveying the images).
In addition to this, it also deals with the installed drivers on your device and considerably more. Here’s how to run this tool on Windows 11 –
- Launch Command Prompt as an administrator.
- When this launches, type the following, and press Enter –
Dism /Online /Cleanup-Image /ScanHealth
- The whole scanning process will take a few minutes depending on the number of files or folders it has to scan. The more the number of files on your computer, the more would be the scanning time.
- Next, copy/paste the below command to check the health of the files that it finds corrupted or problematic.
Dism /Online /Cleanup-Image /CheckHealth
- If this command doesn’t reveal any issue, Windows 11 image is alright and you need not require to do anything. However, if it does find any issues with your device, then execute the command below –
DISM /Online /Cleanup-Image /RestoreHealth

The command above will run to restore the health of all your disk drives.
4] Uninstall then Reinstall Windows 11 updates
If the above three workarounds fail to address the issue that you are dealing with, the problem may lie with any recent app installation or cumulative updates. In case you did install any third-party apps, boot your device into safe mode and check what happens there. This might result in two outcomes –
- The issue persists here as well: Log back into Windows 11 normally, and follow the next solution.
- No issues: This means you have installed a faulty application into your device. If you do remember the latest app installation, uninstall them. After uninstalling the recently installed programs, remove the latest updates as well.
Here’s how to perform this task –
Note: Before you go ahead and remove the latest cumulative or optional updates, ensure creating a system restore point.
- Press “Windows + I” to open Settings.
- Select Windows Update from the left pane.
- Move to the right pane, and click Update History.
- Scroll down to the bottom and hit Uninstall update.

The system will then redirect you to the Control Panel. Here, you will get a list of all major updates. You will not get security refreshes recorded in this rundown as they can not be uninstalled for security reasons.
- Select the Updates that you want to remove from your device.
- Click the Uninstall at the top ribbon.
- Now, for confirmation, a disclaimer message will pop up on your screen, hit Yes to confirm the deletion.
- The selected update will then be uninstalled from your device.
After completing this whole process, restart your device and check whether the issue that you are facing has been fixed or not.
5] Use System Restore Point
If you had enabled protection on the root drive, Windows 11 will create a restore point at some regular intervals. One may use this backup to revert back to a point where everything was working just perfectly.
Even in cases wherein Windows 11 hadn’t created any restore point automatically, you may use the manual one that you have created while enabling protection (assuming you did). Skip this solution if you haven’t created any backup or there isn’t one on your computer.
Here’s how you may use restore point to repair Windows 11 –
- Open the Search window by pressing Win + S.
- Type Create a restore point and press Enter.
- When the System Properties window opens up, click System Restore.
- Hit Next to view the list of restore points lying on your device.
- Pick the latest one, and hit Next again. The system will prepare itself to go back to a stable state.

- Lastly, hit the Finish button.
Note: There’s no turning back once you press the Finish button as this will do more harm than any good.
How to Show Hidden Files and Folders in Windows 11
6] Check if there is storage related issue
Windows 11 PC may also start behaving erroneously when there is a lack of sufficient storage space. Though you can check your disk drives for a red sign, it would be better if you open Task manager and see the current status of the Disk.
Proceeding this way not only displays the current health of the disk drives but also provides a detailed description of which component is consuming high resources.
- Press “Ctrl + Alt + Del” altogether and select the option – Task Manager.
- Go to the Processes tab and see the current status of the Disk.

In case you do find 100% of the disk space occupied (as shown above) or even relatively higher side consumption, you should work to free up spaces.
To do so, you may enable Storage Sense on Windows 11 or use the disk cleanup tool to manually scan and delete the files that you no longer require.
7] Fix Windows 11 Boot Issues
Sometimes you may face boot issues while starting Windows 11 PC. If that’s the case for which you want to repair the OS, you may try this solution instead. In this method, we will let you know how to address boot errors using CMD on your device. However, for this to work, you must boot into recovery mode in Windows 11. Here’s how to perform this task –
- First of all, navigate to the following –
Settings (Win + I) > System > Recovery
- Find and click on the button Restart now under “Recovery”.
- When your device boot into the WinRE, use Shift + F10 to launch Command Prompt.
- Now, run the codes below one by one to fix boot issues –
bootrec.exe
bootrec /fixmbr
bootrec /fixboot
- At last, execute the command below to rebuild your boot device order –
Bootrec /rebuildbcd
That’s it, you have resolved any issues that may occur because of the Windows 11 Boot Order. Go and check if your device reloads fast now.
8] Perform Windows 11 Startup repair
If none of the above workarounds help to fix the issue that you are facing on Windows 11, you should go for the startup repair option. This way, you will fix any issues that lie inside the registry, or other associated errors.
Follow the instructions listed below to see how it works –
- Press “Windows key + X” together.
- Select Settings from the Power menu.
- Select System > Recovery.
- Click on Restart now (available under the Recovery section).
- Your device will next boot into WinRE (Windows Recovery Environment).
- On the WinRE page, proceed as follows –
Troubleshoot > Advanced options > Startup Repair

Wait till this tool finds and repairs any bugs or issues available on your device. This tool will also repair any registry issues as well.
9] Reset Your Device
Very alike to Startup Repair, this method will also reset your device to its default state. The only difference between these two methods is – Startup Repair works on the starting apps only whereas Reset this PC refreshes the whole operating system. Let’s see how to reset your device –
- Press Win + S.
- Type Reset this pc on the Search bar and press Enter.
- The system will redirect you to the Recovery options page.
- Click Reset PC.

- A new Windows will come into the view displaying two options.
- Select the first one i.e. ‘Keep my file‘ if you do not want to lose any file or data. You may go for the second option if you think otherwise.
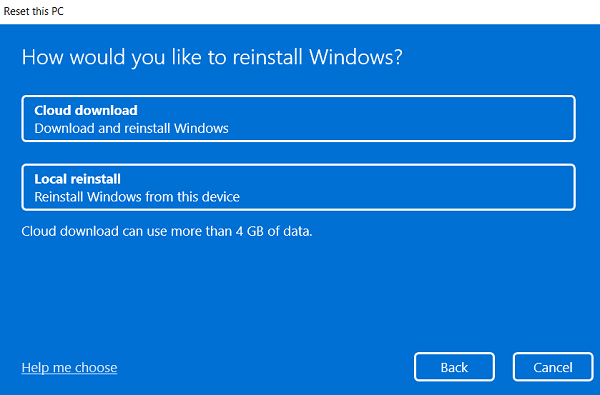
- Again, you have two options to choose from. Choose Cloud download if you don’t have Windows 11 ISO file with you. If you do have an iso image, click Local reinstall instead.
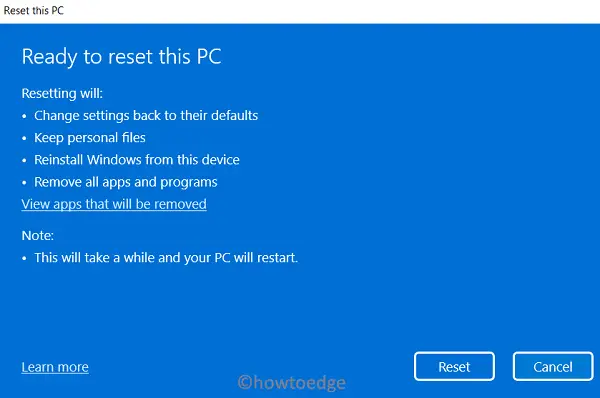
- Click Next again and then hit Reset to start resetting your PC.
How to reset this PC using Cloud Download on Windows
I hope by now your device is all okay and running Windows 11 without any glitches.


