Did you recently encounter an error code 0x800F080C while starting any program on Windows 11/10? Well, this issue primarily occurs because of two reasons they are using an obsolete .NET Framework, or the system files/ Windows components have become corrupted.
Furthermore, a few users complained of not being able to install the required .NET framework packages upon receiving this problem. Worry not, as we have come up with a handful of solutions that will definitely address this bug. Let’s explore the workarounds in detail –
Fix .NET Framework Error 0x800F080C
If you are getting this error code while starting any application on Windows 10, try out these methods sequentially –
1] Reset Windows Update Components
Before proceeding to the preferred solutions, you need to ensure that all Windows update components are up to date and are working fine. In case, any one of them gets corrupted somehow, neither of the below workarounds will resolve the 0X800F080C issue. Here’s how to reset update components on Windows 10.
2] Install .NET 3.5 framework from Windows features
As discussed above, the error code 0x800F080C may occur due to issues inside the .NET Framework itself. So, you should attempt installing the latest framework update via Windows Features. To do so, use these steps –
- Right-click on the Windows icon and select Run.
- Type “
appwiz.cpl” and hit OK. - The system will then take to the Programs and Features window.
- Click the “Turn Windows features on or off” link on the left column.
- Check the box – “NET Framework 3.5 (includes .NET 2.0 and 3.0)” and hit OK again.

- Select “Let Windows Update download the files for you” and wait for the package installation.
- The system will then download and install the required files (if connected to a good-speed internet) in 1-2 minutes. The time duration may vary for poor network connectivity.
- Once this is over, restart your PC so that the changes made become effective.
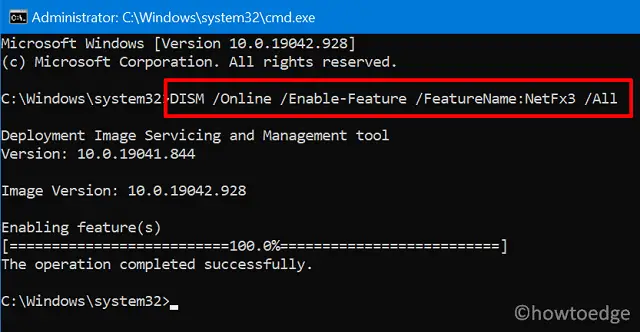
Alternatively, you may also use the DISM tool to create a modified system image and deploy the .NET framework. All you require is to open the Command Prompt as an Administrator and execute the below code –
DISM /Online /Enable-Feature /FeatureName:NetFx3 /All

Running this code will force Windows Update to download and install the latest version of the .NET Framework 3.5. So, make sure to remain connected to the internet while performing this task.
3] Run .NET Framework Repair Tool to fix Error 0x800F080C
If the error 0x800F080C occurs again, you may use the default troubleshooter by Microsoft to sort out the actual problems. All you require is to download/install this repair tool and run it on your computer.
Here are the essential steps to work upon –
- Visit the official website of Microsoft and download the troubleshooting tool.
- When the download completes, double-click over the setup file to begin its installation.
- I hope running this tool will fix the issue that you are getting on your computer.
If not, this might not be an issue related to .NET Framework. Instead, it could be occurring due to corrupted system files, or Update components. If that’s the case, you may perform two basic scans on your device. These scans are
- System File Checker (SFC)
- Deployment Image Servicing and Management (DISM)
4] Run SFC Scan
SFC is a great utility program by Microsoft that Windows 10 users can use to repair corrupted files and restore missing files. Here’s how to perform an SFC scan on your device –
- Open Command Prompt (Admin).
- On the elevated console, type “
sfc/scannow“, and press Enter.

- Let this tool scan and repair the damaged files.
- When the scanning/repairing process finishes 100%, close all running Windows, and restart your PC.
When Windows 10 reloads, check if the error 0x800F080C is re-occurring or has been resolved.
5] Perform a DISM Scan to fix Error 0x800F080C
If you had previously installed a buggy update or Windows 10 image has been corrupted somehow, this may result in similar errors. In such a scenario, you may initiate a DISM scan using the steps below –
- Press Win + R to launch the Run dialog.
- Type “CMD“, and press and hold Ctrl + Shift + Enter keys to launch Command Prompt (Admin).
- Next, copy/paste the below code and press Enter again –
DISM /Online /Cleanup-Image /ScanHealth

Note: Unlike SFC, DISM works to replace the corrupted Windows file instances with healthier copies downloaded over the internet. Hence, make sure that you are connected to a good network.
6] Install a fresh copy of Windows 10
By now, you must have resolved the Error code 0X800F080C on your computer. If not, you may try a few other solutions as well like booting your device into the safe mode and re-try the 2nd solution. However, we recommend backing up your personal data and installing a fresh copy of Windows 10.
This will not only save lots of time debugging a complex bug but also make your PC fast and efficient.


